Running Fluidsynth on a Raspberry PI Zero W

One of the reasons I’ve spent so much time experimenting with audio software on Raspberry Pis is to build standalone music sculpture. I want to make machines that explore time and texture, in addition to generating interesting music.

The first soft synth I tried was Fluidsynth. It’s one of the few that can run headless, without a GUI. I set it up on a Pi 3 and it worked great. It’s used as a basic General MIDI synthesizer engine for a variety of packages and even powers game soundtracks on Android.


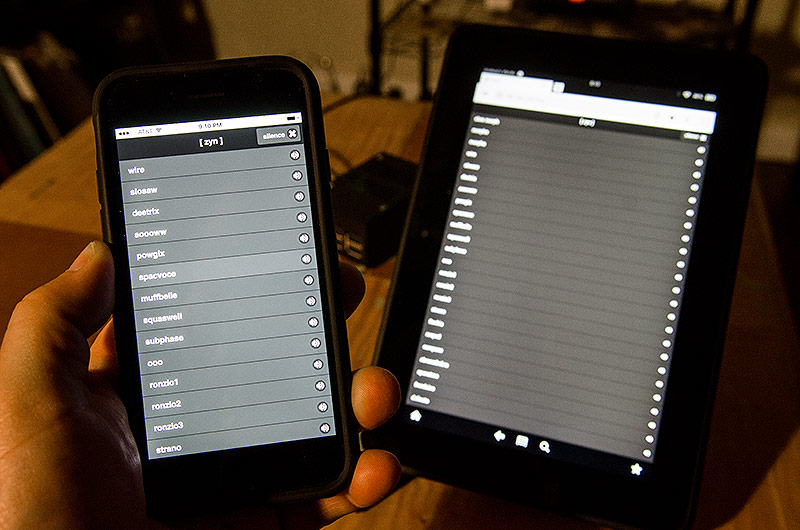
This video is a demo of the same sound set used in this project, but on an earlier iteration using a regular Raspberry Pi 3 and a Pimoroni Displayotron HAT. I ended up switching to the smaller Raspberry Pi Zero W and using a webapp instead of a display.

The sounds are not actually generated from scratch, like a traditional synthesizer. It draws on a series of predefined sounds collected and mapped in SoundFonts. The .sf2 format was made popular by the now defunct Sound Blaster AWE32 sound card that was ubiquitous on 90s PCs.

Back then, there was a niche community of people producing custom SoundFonts. Because of that, development in library tools and players was somewhat popular. Fluidsynth came long after, but benefits from the early community work and a few nostalgic archivists.

The default SoundFont that comes with common packages is FluidR3_GM. It is a full General Midi set with 128 instruments a small variety of drum kits. It’s fine for building a basic keyboard or MIDI playback utility. But, it’s not very high fidelity or interesting.

What hooked me was finding a repository of commercial SoundFonts (no longer active). That site has an amazing collection of 70s-90s synths in SoundFont format, including Jupiter-8, TB-303, Proteus 1/2/3, Memory Moog, and an E-MU Modular. The E-MU Modular sounds pretty rad and is the core of the sound set I put together for this. They’re all cheap and I picked up a few to work with. The sound is excellent.

Raspberry Pi Zero W

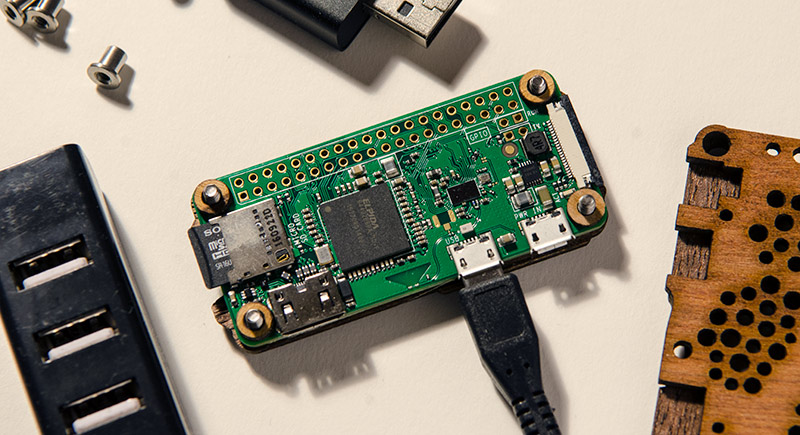
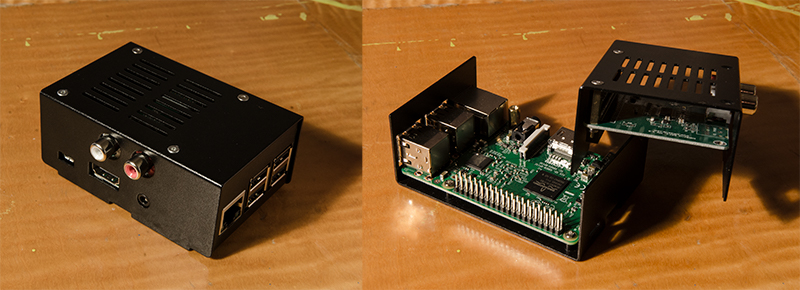
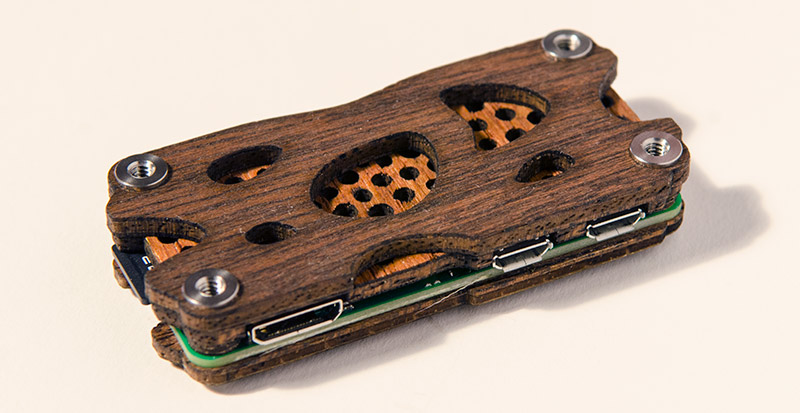
For this particular project, I ended up using a Raspberry Pi Zero W for its size and versatility. Besides running Fluidsynth, it also serves up a Node.js webapp over wifi for changing instruments. It’s controllable by any basic USB MIDI keyboard and runs on a mid-sized USB battery pack for around 6 hours. Pretty good for such a tiny footprint and it costs around $12.

Setting it up

If you want to get something working fast or just want to make a kid’s keyboard, setup is a breeze.

After configuring the Pi Zero and audio:

sudo apt-get install fluidsynth

That’s it.

But, if you want more flexibility or interactivity, things get a bit more complex. The basic setup is the same as what I laid out in my ZynAddSubFX post.

Download Jessie Lite and find a usable Micro SD card. The following is for Mac OS. Instructions for Linux are similar and Windows details can be found on the raspberrypi.org site.

Insert the SD card into your computer and find out what designation the OS gave it. The unmount it and write the Jessie Lite image to it.

diskutil list

/dev/disk1 (external, physical):
 #: TYPE NAME SIZE IDENTIFIER
 0: FDisk_partition_scheme *8.0 GB disk1
 1: Windows_FAT_32 NO NAME 8.0 GB disk1s1

diskutil unmountDisk /dev/disk1

sudo dd bs=1m if=2017-04-10-raspbian-jessie-lite.img of=/dev/rdisk1

Pull the card out and reinsert it. Then, add two files to the card to make setup a little faster and skip a GUI boot.

cd /Volumes/boot
touch ssh

sudo nano wpa_supplicant.conf

Put this into the file you just opened.

ctrl_interface=DIR=/var/run/wpa_supplicant GROUP=netdev
update_config=1

network={
 ssid="<your_ssid>"
 psk="<your_password>"
}

Put the card in the Pi Zero and power it up, then configure the box with raspi-config. One trick I learned was not to change the root password and expand the file system at the same time. I’m not sure what the problem is, but often it corrupts the ssh password to do both at the same time.

Update the Pi:

sudo apt-get update
sudo apt-get upgrade

Fluidsynth needs a higher thread priority than the default, so I use the same approach as setting up Realtime Priority. It might be overkill, but it’s consistent with the other Pi boxes I set up. Add the user “pi” to the group “audio” and then set expanded limits.

Pi commands

sudo usermod -a -G audio pi

sudo nano /etc/security/limits.d/audio.conf

The file should be empty. Add this to it.

@audio - rtprio 80
@audio - memlock unlimited

If you’re not using an external USB audio dongle or interface, you don’t need to do this. But, after you hear what the built-in audio sounds like, you’ll want something like this.

sudo nano /boot/config.txt

Comment out the built-in audio driver.

# Enable audio (loads snd_bcm2835)
# dtparam=audio=on
sudo nano /etc/asound.conf

Set the USB audio to be default. It’s useful to use the name of the card instead of the stack number.

pcm.!default {
 type hw card Device
 }
 ctl.!default {
 type hw card Device
 }

Reboot and then test your setup.

sudo reboot

aplay -l

lsusb -t

speaker-test -c2 -twav

A voice should speak out the left and right channels. After verifying that, it’s time to set up Fluidsynth.

The reason I compile it from the git repo is to get the latest version. The version in the default Raspbian repository used by apt-get is 1.1.6-2. The latest is 1.1.6-4. The reason we need this is Telnet.

That’s right, Fluidsynth uses Telnet to receive commands and as its primary shell. It’s a classic text based network communication protocol used for remote administration. Think Wargames.

Telnet

But, there’s a bug in the standard package that causes remote sessions to get rejected in Jessie. It’s been addressed in the later versions of Fluidsynth. I needed it to work to run the web app.

Grab the dependencies and then compile Fluidsynth. It’s not complicated, but there are some caveats.

sudo apt-get install git libgtk2.0-dev cmake cmake-curses-gui build-essential libasound2-dev telnet

git clone git://git.code.sf.net/p/fluidsynth/code-git

cd code-git/fluidsynth
 mkdir build
 cd build
 cmake ..
 sudo make install

The install script misses a key path definition that aptitude usually handles, so I add it manually. It’s needed so libfluidsynth.so.1 can be found. If you see an error about that file, this is why.

sudo nano /etc/ld.so.conf

Add this line:

/usr/local/lib

Then:

sudo ldconfig
 export LD_LIBRARY_PATH=/usr/local/lib

Now we need to grab the default SoundFont. This is available easily with apt-get.

sudo apt-get install fluid-soundfont-gm

That’s it for Fluidsynth. It should run fine and you can test it with a help parameter.

fluidsynth -h

Now to install Node.js and the webapp to change instruments with.

curl https://raw.githubusercontent.com/creationix/nvm/master/install.sh | sh

Logout and log back into an ssh session. That makes nvm available.

nvm install v6.10.1

Grab the webapp from my repo and install it.

git clone https://github.com/lucidbeaming/Fluidsynth-Webapp.git fluidweb

cd fluidweb

npm install --save

Find the IP address of you Pi on your local network. Visit <ip address> port 7000 on any other device.

http://192.168.1.20:7000

If Fluidsynth isn’t running, it will display a blank page. If it is running, it will list all instruments available, dynamically. This won’t be much of a problem once the launch script is setup. It launches Fluidsynth, connects any keyboards attached through ALSA, and launches the webapp.

Create the script and add the following contents. It’s offered as a guideline and probably won’t work if copied and pasted. You should customize it according to your own environment, devices, and tastes.

sudo nano fluidsynth.sh
#!/bin/bash

if pgrep -x "fluidsynth" > /dev/null
then
echo fluidsynth already flowing
else
fluidsynth -si -p "fluid" -C0 -R0 -r48000 -d -f ./config.txt -a alsa -m alsa_seq &
fi

sleep 3

mini=$(aconnect -o | grep "MINILAB")
mpk=$(aconnect -o | grep "MPKmini2")
mio=$(aconnect -o | grep "mio")

if [[ $mini ]]
then
aconnect 'Arturia MINILAB':0 'fluid':0
echo MINIlab connected
elif [[ $mpk ]]
then
aconnect 'MPKmini2':0 'fluid':0
echo MPKmini connected
elif [[ $mio ]]
then
aconnect 'mio':0 'fluid':0
echo Mio connected
else
echo No known midi devices available. Try aconnect -l
fi

cd fluidweb
node index.js
cd ..

exit

Note that I included the settings -C0 -R0 in the Fluidsynth command. That turns off reverb and chorus, which saves a bit of processor power and doesn’t sound good anyway.

Now, create a configuration file for Fluidsynth to start with.

sudo nano config.txt
echo "Exploding minds"
gain 3
load "./soundfonts/lucid.sf2"
select 0 1 0 0
select 1 1 0 1
select 2 1 0 2
select 3 1 0 3
select 4 1 0 4
select 5 1 0 5
select 6 1 0 6
select 7 1 0 7
select 8 1 0 8
select 10 1 0 9
select 11 1 0 10
select 12 1 0 11
select 13 1 0 12
select 14 1 0 13
select 15 1 0 14
echo "bring it on"

The select command chooses instruments for various channels.

select <channel> <soundfont> <bank> <program>

Note that channel 9 is the drumkit.

To get the launch script to run on boot(or session) it needs to have the right permissions first.

sudo chmod a+x fluidsynth.sh

Then, add the script to the end of .bash_profile. I do that instead of other options for running scripts at boot so that fluidsynth and node.js run as a user process for “pi” instead of root.

sudo nano .bash_profile

At the end of the file…

./fluidsynth.sh

Reboot the Pi Zero and when it gets back up, it should run the script and you’ll be good to go. If you run into problems, a good place to get feedback is LinuxMusicians.com. They have an active community with some helpful folks.

Raspberry Pi Zero W in a case

Here’s another quick demo I put together. Not much in terms my own playing, haha, but does exhibit some of the sounds I’m going for.


Setting up a Raspberry Pi 3 to run ZynAddSubFX in a headless configuration

Most of my music is production oriented and I don’t have a lot of live performance needs. But, I do want a useful set of evocative instruments to take to strange places. For that, I explored the options available for making music with Raspberry Pi minicomputers.

The goal of this particular box was to have the Linux soft-synth ZynAddSubFX running headless on a battery powered and untethered Raspberry Pi, controllable by a simple MIDI keyboard and an instrument switcher on my phone.

Getting things to run on the desktop version of Raspbian and ZynAddSubFX was pretty easy, but stripping away all the GUI and introducing command line automation with disparate multimedia libraries was a challenge. Then, opening it up to remote control over wifi was a rabbit hole of its own.

But, I got it working and it sounds pretty amazing.


Setting up the Raspberry Pi image

I use Jessie Lite because I don’t need the desktop environment. It’s the same codebase without a few bells and whistles. When downloading from rasperrypi.org, choose the torrent for a much faster transfer than getting the ZIP directly from the site. These instructions below are for Mac OS X, using Terminal.

diskutil list

/dev/disk1 (external, physical):
#:                       TYPE NAME                    SIZE       IDENTIFIER
0:        FDisk_partition_scheme                        *8.0 GB     disk1
1:                 DOS_FAT_32 NO NAME                 8.0 GB     disk1s1

diskutil unmountDisk /dev/disk1

sudo dd bs=1m if=2017-04-10-raspbian-jessie-lite.img of=/dev/rdisk1

After the image gets written, I create an empty file on the boot partition to enable ssh login.

cd /Volumes/boot
touch ssh

Then, I set the wifi login so it connects to the network on first boot.

sudo nano wpa_supplicant.conf

ctrl_interface=DIR=/var/run/wpa_supplicant GROUP=netdev
update_config=1

network={
 ssid="<your_ssid>"
 psk="<your_password>"
 }

The card gets removed from the laptop and inserted into the Pi. Then, after it boots up I go through the standard setup from the command line. The default login is “pi” and the default password is “raspberry”.

sudo raspi-config

[enable ssh,i2c. expand filesystem. set locale and keyboard.]

After setting these, I let it restart when prompted. When it comes back up, I update the codebase.

sudo apt-get update
sudo apt-get upgrade

Base configuration

Raspberry config for ZynAddSubFX

ZynAddSubFX is greedy when it comes to processing power and benefits from getting a bump in priority and memory resources. I add the default user (pi) to the group “audio” and assign the augmented resources to that group, instead of the user itself.

sudo usermod -a -G audio pi

sudo nano /etc/security/limits.d/audio.conf

...
@audio - rtprio 80
@audio - memlock unlimited
...

The Raspbian version of Jessie Lite has CPU throttles, or governors, set to conserve power and reduce heat from the CPU. By default, they are set to “on demand”. That means the voltage to the CPU is reduced until general use hits 90% of CPU capacity. Then it triggers a voltage (and speed) increase to handle the load. I change that to “performance” so that it has as much horsepower available.

This is done in rc.local:

sudo nano /etc/rc.local
...
echo "performance" > /sys/devices/system/cpu/cpu0/cpufreq/scaling_governor
echo "performance" > /sys/devices/system/cpu/cpu1/cpufreq/scaling_governor
echo "performance" > /sys/devices/system/cpu/cpu2/cpufreq/scaling_governor
echo "performance" > /sys/devices/system/cpu/cpu3/cpufreq/scaling_governor
...

Note that it gets set for all four cores, since the Raspberry Pi is multi-core. For more info about governors and even overclocking, this is a good resource.

Virtual memory also needs to get downgraded so there is little swap activity. Zynaddsubfx is power hungry but doesn’t use much memory, so it doesn’t need VM.

sudo /sbin/sysctl -w vm.swappiness=10

Now, to set up the audio interface. For my ZynAddSubFX box, I use an IQaudio Pi-DAC+. I’ve also used a standard USB audio interface and have instructions for that in my post about the Pi Zero. Raspbian uses Device Tree overlays to load I2C, I2S, and SPI interface modules. So, instead of separate drivers to install, I just edit config.txt to include the appropriate modules for the Pi-DAC+. Note that I also disabled the crappy built-in audio by commenting out “dtparam=audio=on”. This helps later on when setting the default audio device used by the system.

sudo nano /boot/config.txt

...

# Enable audio (loads snd_bcm2835)
# dtparam=audio=on

dtoverlay=i2s-mmap
dtoverlay=hifiberry-dacplus

...

For Jack to grab hold of the Pi-DAC+ for output, the default user (pi) needs a DBus security policy for the audio device.

sudo nano /etc/dbus-1/system.conf

...
<!-- Only systemd, which runs as root, may report activation failures. -->
<policy user="root">
<allow send_destination="org.freedesktop.DBus"
    send_interface="org.freedesktop.systemd1.Activator"/>
</policy>
<policy user="pi">
    <allow own="org.freedesktop.ReserveDevice1.Audio0"/>
</policy>
...

Next, ALSA gets a default configuration for which sound device to use. Since I disabled the built-in audio earlier, the Pi-DAC+ is now “0” in the device stack.

sudo nano /etc/asound.conf

pcm.!default {
 type hw card 0
 }
ctl.!default {
 type hw card 0
 }

sudo reboot

Software installation

ZynAddSubFX has thick dependency requirements, so I collected the installers in a bash script. Most of it was lifted from the Zynthian repo. Download the script from my Github repo to install the required packages and run it. The script also includes rtirq-init, which can improve performance on USB audio devices and give ALSA some room to breath.

git clone https://raw.githubusercontent.com/lucidbeaming/pi-synths/master/ZynAddSubFX/required-packages.sh

sudo chmod a+x required-packages.sh

./required-packages.sh

Now the real meat of it all gets cooked. There are some issues with build optimizations for SSE and Neon (incompatible with ARM processors), so you’ll need to disable those in the cmake configuration.

git clone https://github.com/zynaddsubfx/zynaddsubfx.git
cd zynaddsubfx
mkdir build
cd build
cmake ..
ccmake .
[remove SSE parameters and NoNeonplease=ON]
sudo make install

Usually takes 20-40 minutes to compile. Now to test it out and get some basic command line options listed.

zynaddsubfx -h

Usage: zynaddsubfx [OPTION]

-h , –help Display command-line help and exit
-v , –version Display version and exit
-l file, –load=FILE Loads a .xmz file
-L file, –load-instrument=FILE Loads a .xiz file
-r SR, –sample-rate=SR Set the sample rate SR
-b BS, –buffer-size=SR Set the buffer size (granularity)
-o OS, –oscil-size=OS Set the ADsynth oscil. size
-S , –swap Swap Left <–> Right
-U , –no-gui Run ZynAddSubFX without user interface
-N , –named Postfix IO Name when possible
-a , –auto-connect AutoConnect when using JACK
-A , –auto-save=INTERVAL Automatically save at interval (disabled with 0 interval)
-p , –pid-in-client-name Append PID to (JACK) client name
-P , –preferred-port Preferred OSC Port
-O , –output Set Output Engine
-I , –input Set Input Engine
-e , –exec-after-init Run post-initialization script
-d , –dump-oscdoc=FILE Dump oscdoc xml to file
-u , –ui-title=TITLE Extend UI Window Titles

The web app

Webapp to switch ZynAddSubFX instruments

I also built a simple web app to switch instruments from a mobile device (or any browser, really). It runs on Node.js and leverages Express, Socket.io, OSC, and Jquery Mobile.

First, a specific version of Node is needed and I use NVM to grab it. The script below installs NVM.

curl https://raw.githubusercontent.com/creationix/nvm/master/install.sh | sh

Logout and log back in to have NVM available to you.

nvm install v6.10.1

My Node app is in its own repo. The dependencies Express, Socket.io, and OSC will be installed with npm from the included package.json file.

git clone https://github.com/lucidbeaming/ZynAddSubFX-WebApp.git
cd ZynAddSubFX-WebApp
npm install

Test the app from the ZynAddSubFX-WebApp directory:

node index.js

On a phone/tablet (or any browser) on the same wifi network, go to:

http://<IP address of the Raspberry Pi>:7000

Image of webapp to switch instruments

You should see a list of instruments to choose from. It won’t do anything yet, but getting the list to come up is a sign of initial success.

Now, for a little secret sauce. The launch script I use is from achingly long hours of trial and error. The Raspberry Pi is a very capable machine but has limitations. The command line parameters I use come from the best balance of performance and fidelity I could find. If ZynAddSubFX gets rebuilt with better multimedia processor optimizations for ARM, this could change. I’ve read that improvements are in the works. Also, this runs Zynaddsubfx without Jack and just uses ALSA. I was able to get close to RTprio with the installation of rtirq-init.

#!/bin/bash

export DBUS_SESSION_BUS_ADDRESS=unix:path=/run/dbus/system_bus_socket

if pgrep zynaddsubfx
 then
 echo Zynaddsubfx is already singing
 exit 0
 else
 zynaddsubfx -U -A=0 -o 512 -r 96000 -b 512 -I alsa -O alsa -P 7777 -L "/usr/local/share/zynaddsubfx/banks/Choir and Voice/0034-Slow Morph_Choir.xiz" &
 sleep 4

   if pgrep zynaddsubfx
   then
   echo Zyn is singing
   else
   echo Zyn blorked. Epic Fail.
   fi

fi

mini=$(aconnect -o | grep "MINILAB")
 mpk=$(aconnect -o | grep "MPKmini2")
 mio=$(aconnect -o | grep "mio")

if [[ $mini ]]
 then
 aconnect 'Arturia MINILAB':0 'ZynAddSubFX':0
 echo Connected to MINIlab
 elif [[ $mpk ]]
 then
 aconnect 'MPKmini2':0 'ZynAddSubFX':0
 echo Connected to MPKmini
 elif [[ $mio ]]
 then
 aconnect 'mio':0 'ZynAddSubFX':0
 echo Connected to Mio
 else
 echo No known midi devices available. Try aconnect -l
 fi

exit 0

I have 3 MIDI controllers I use for these things and this script is set to check for any of them, in order of priority, and connect them with ZynAddSubFX. Also, I have a few “sleep” statements in there that I’d like to remove when I find a way of including graceful fallback and error reporting from a bash script. For now, this works fine.

I add this line to rc.local to launch Zynaddsubfx automatically on boot and connect MIDI.

su pi -c '/home/pi/zynlaunch.sh >> /tmp/zynaddsubfx.log 2>&1 &'

Unfortunately, Node won’t launch the web app from rc.local, so I add some conditionals to /home/pi/.profile to launch the app after the boot sequence.

if pgrep zynaddsubfx
then
echo Zynaddsubfx is singing
fi

if pgrep node
then
echo Zyn app is up
else
node /home/pi/ZynAddSubFX-WebApp/index.js
fi

Making music

This ended up being a pad and drone instrument in my tool chest. ZynAddSubFX is really an amazing piece of software and can do much more than I’m setting up here. The sounds are complex and sonically rich. The GUI version lets you change or create instruments with a deep and precise set of graphic panels.

For my purposes, though, I want something to play live with that has very low resource needs. This little box does just that.

Raspberry Pi 3 with Pi-DAC+